User guide · v1.2.0
Set up your hotel and take bookings
Flexatech Stay Suite turns WordPress into a self-contained booking engine for hotels, guesthouses and vacation rentals. No WooCommerce required. Follow this guide in order the first time, then dip back in whenever you need a refresher.
Step 1
Getting started
After activation you get a new Stay Suite item in the WordPress admin menu, marked with a building icon. Everything in this guide lives under that menu.
- In the WordPress admin sidebar, click Stay Suite.
- The first time you open it, the plugin sends you to the Setup screen. The tabs across the top - Dashboard, Calendar, Bookings, Rates & Inventory, Coupons, Settings - are the areas you will work in.
- Work top to bottom: create a property, add rooms, set rates and inventory, then publish the booking pages. The Setup screen tracks each of these for you.
Property, room, rate - what is what
Optional
Try it with sample data
Not sure where to start? Import a ready-made sample hotel and explore the whole booking flow before you build your own. It is one click, and it is just as easy to remove.
- Open the Setup screen and find the Demo content card.
- Click Import demo content. In a moment you get a sample property, four rooms with pricing and 120 days of availability, add-ons, discount coupons, and a handful of example bookings.
- Browse the storefront and the admin screens with real-looking data: the Dashboard KPIs, the Bookings list and the Calendar are all populated so you can see how everything fits together.
Remove it when you go live
Import once
Step 2
The Setup dashboard
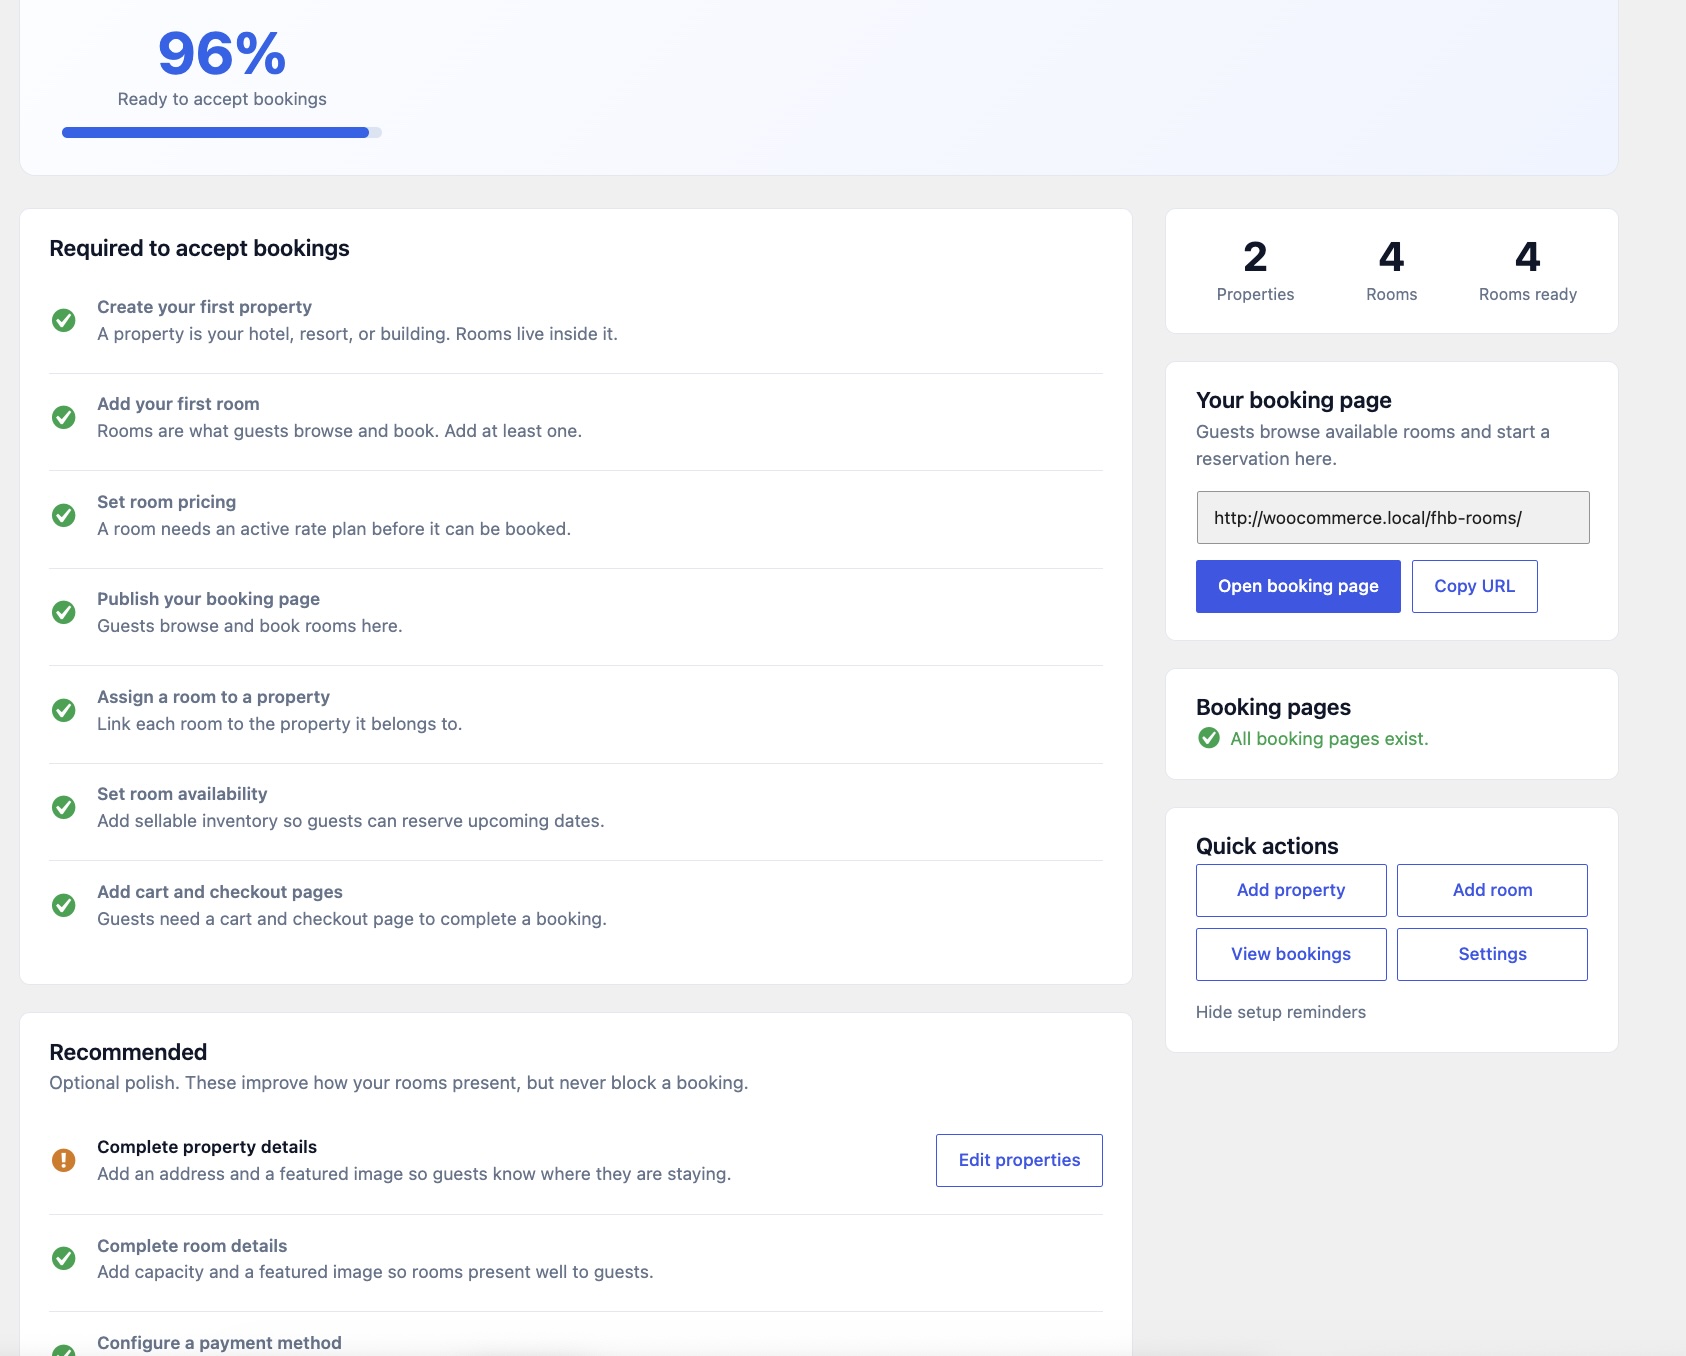
The Setup screen is a live checklist. It reads your real data - properties, rooms, pricing, inventory, pages and payment methods - and shows a completion percentage plus a ready to accept bookings state. It never hard-codes the number; every item reflects what actually exists.
| Marker | Meaning |
|---|---|
✓ | Complete |
! | Needs attention |
○ | Not started |
— | Optional |
Items are grouped by importance. The critical and required items gate whether you can take bookings; recommended items (such as a property photo) improve the listing but never block you. Use the Create booking pages button here to generate the storefront pages in one click.
Step 3
Create your property
A property groups your rooms and holds the details guests see: address, phone, email and the default check-in / check-out times.
- Go to Properties → Add New and give the property a name (your hotel name).
- Fill in the property details panel: address, contact email and phone, and the standard check-in and check-out times.
- Set a featured image. It is used as the property photo in listings.
- Publish. Most single-location hotels only need one property; add more only if you run separate buildings or locations.
Step 4
Add rooms
Each room is a bookable unit. Create one per room type (for example “Deluxe Double”), or one per physical unit if you sell specific rooms.
- Go to Rooms → Add New and name the room.
- In the room details, choose the property it belongs to, and set the capacity (adults and children).
- Add a featured image and a gallery so guests can see the room.
- Optionally assign a room type and amenities (these are taxonomies used for filtering and display), then Publish.
A new room is not bookable yet
Step 5
Rates & pricing
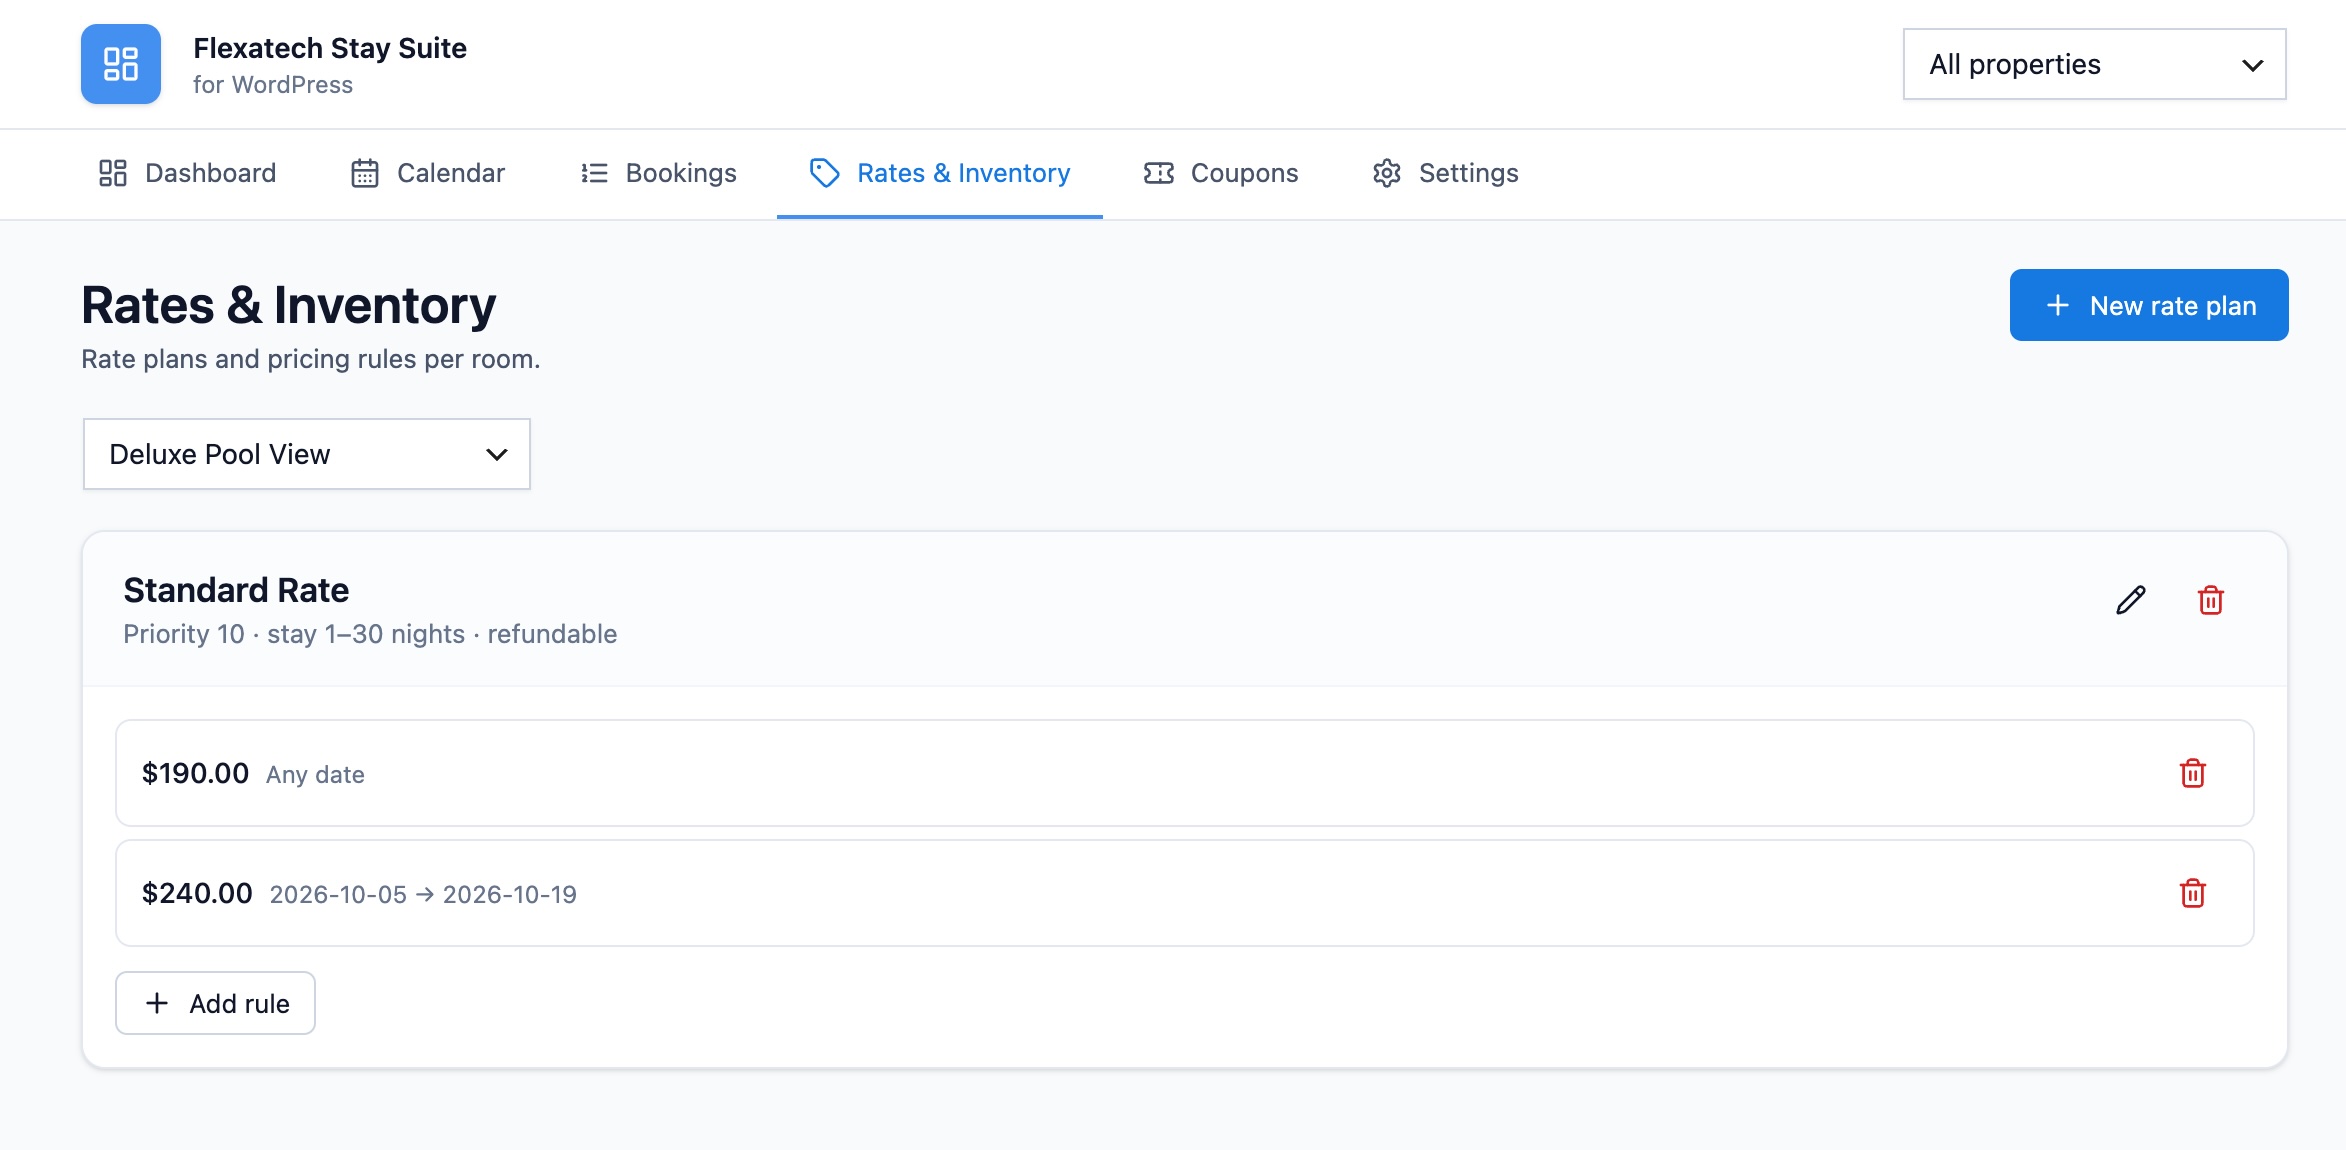
Pricing lives in the Rates & Inventory tab, not on the room itself. You attach a rate plan to a room and give it at least one rule (a nightly price). Prices are stored in the smallest currency unit (cents), so there is no rounding drift.
- Open Rates & Inventory and pick a room.
- Create a rate plan and add a rule with the nightly price. A room becomes priceable as soon as an active plan has one rule.
- Use date overrides for special pricing on specific dates (weekends, holidays, high season).
Deposits
Step 6
Inventory & availability
Inventory is how many of a room are sellable on each date. A room is only bookable on days that have inventory, so availability never goes negative and you cannot oversell.
- In Rates & Inventory, set the total number of units available for the room across the dates you want to sell.
- As bookings come in, remaining availability is calculated automatically from your total minus what is already held or booked.
Step 7
Publish the booking pages
The storefront runs on a small set of pages: a booking page (search + room list), a cart, a checkout, and optionally a confirmation page and a “My bookings” account page. You do not have to build them by hand.
- On the Setup screen, click Create booking pages. Missing pages are created and seeded with the right shortcodes. It is safe to run again; it skips pages that already exist.
- Prefer to place the content yourself? Add the
[flexatech_hotel_search]and[flexatech_hotel_rooms]shortcodes (or the matching blocks) to any page. - The Setup screen detects your booking page automatically by its content and shows the real URL, so the link is never guessed or hard-coded.
Works out of the box
/rooms/ archive, which renders the same search and list.Step 8
Payment methods
Choose how guests pay under Settings → Payments. The offline method (pay on arrival / bank transfer) is enabled by default so you can take bookings immediately.
| Method | Best for |
|---|---|
| Offline | Pay on arrival, bank transfer, or manual confirmation. On by default. |
| Stripe | Instant card payments and automatic refunds. |
| PayPal | PayPal balance and card payments via PayPal. |
Enable a method, add its credentials, and it appears at checkout. Refunds for Stripe and PayPal can be issued from the booking.
Day to day
Manage bookings
The Bookings tab lists every reservation with its status. Open one to see the guest, dates, rooms, payments and the balance due.
| Status | Meaning |
|---|---|
| Pending | Awaiting payment or confirmation. |
| Processing | Paid or confirmed, stay upcoming. |
| Completed | Stay finished. |
| Cancelled | Released; the held inventory is returned. |
Unpaid holds and abandoned online payments are released automatically after their grace window, returning the inventory to the pool.
Day to day
Calendar
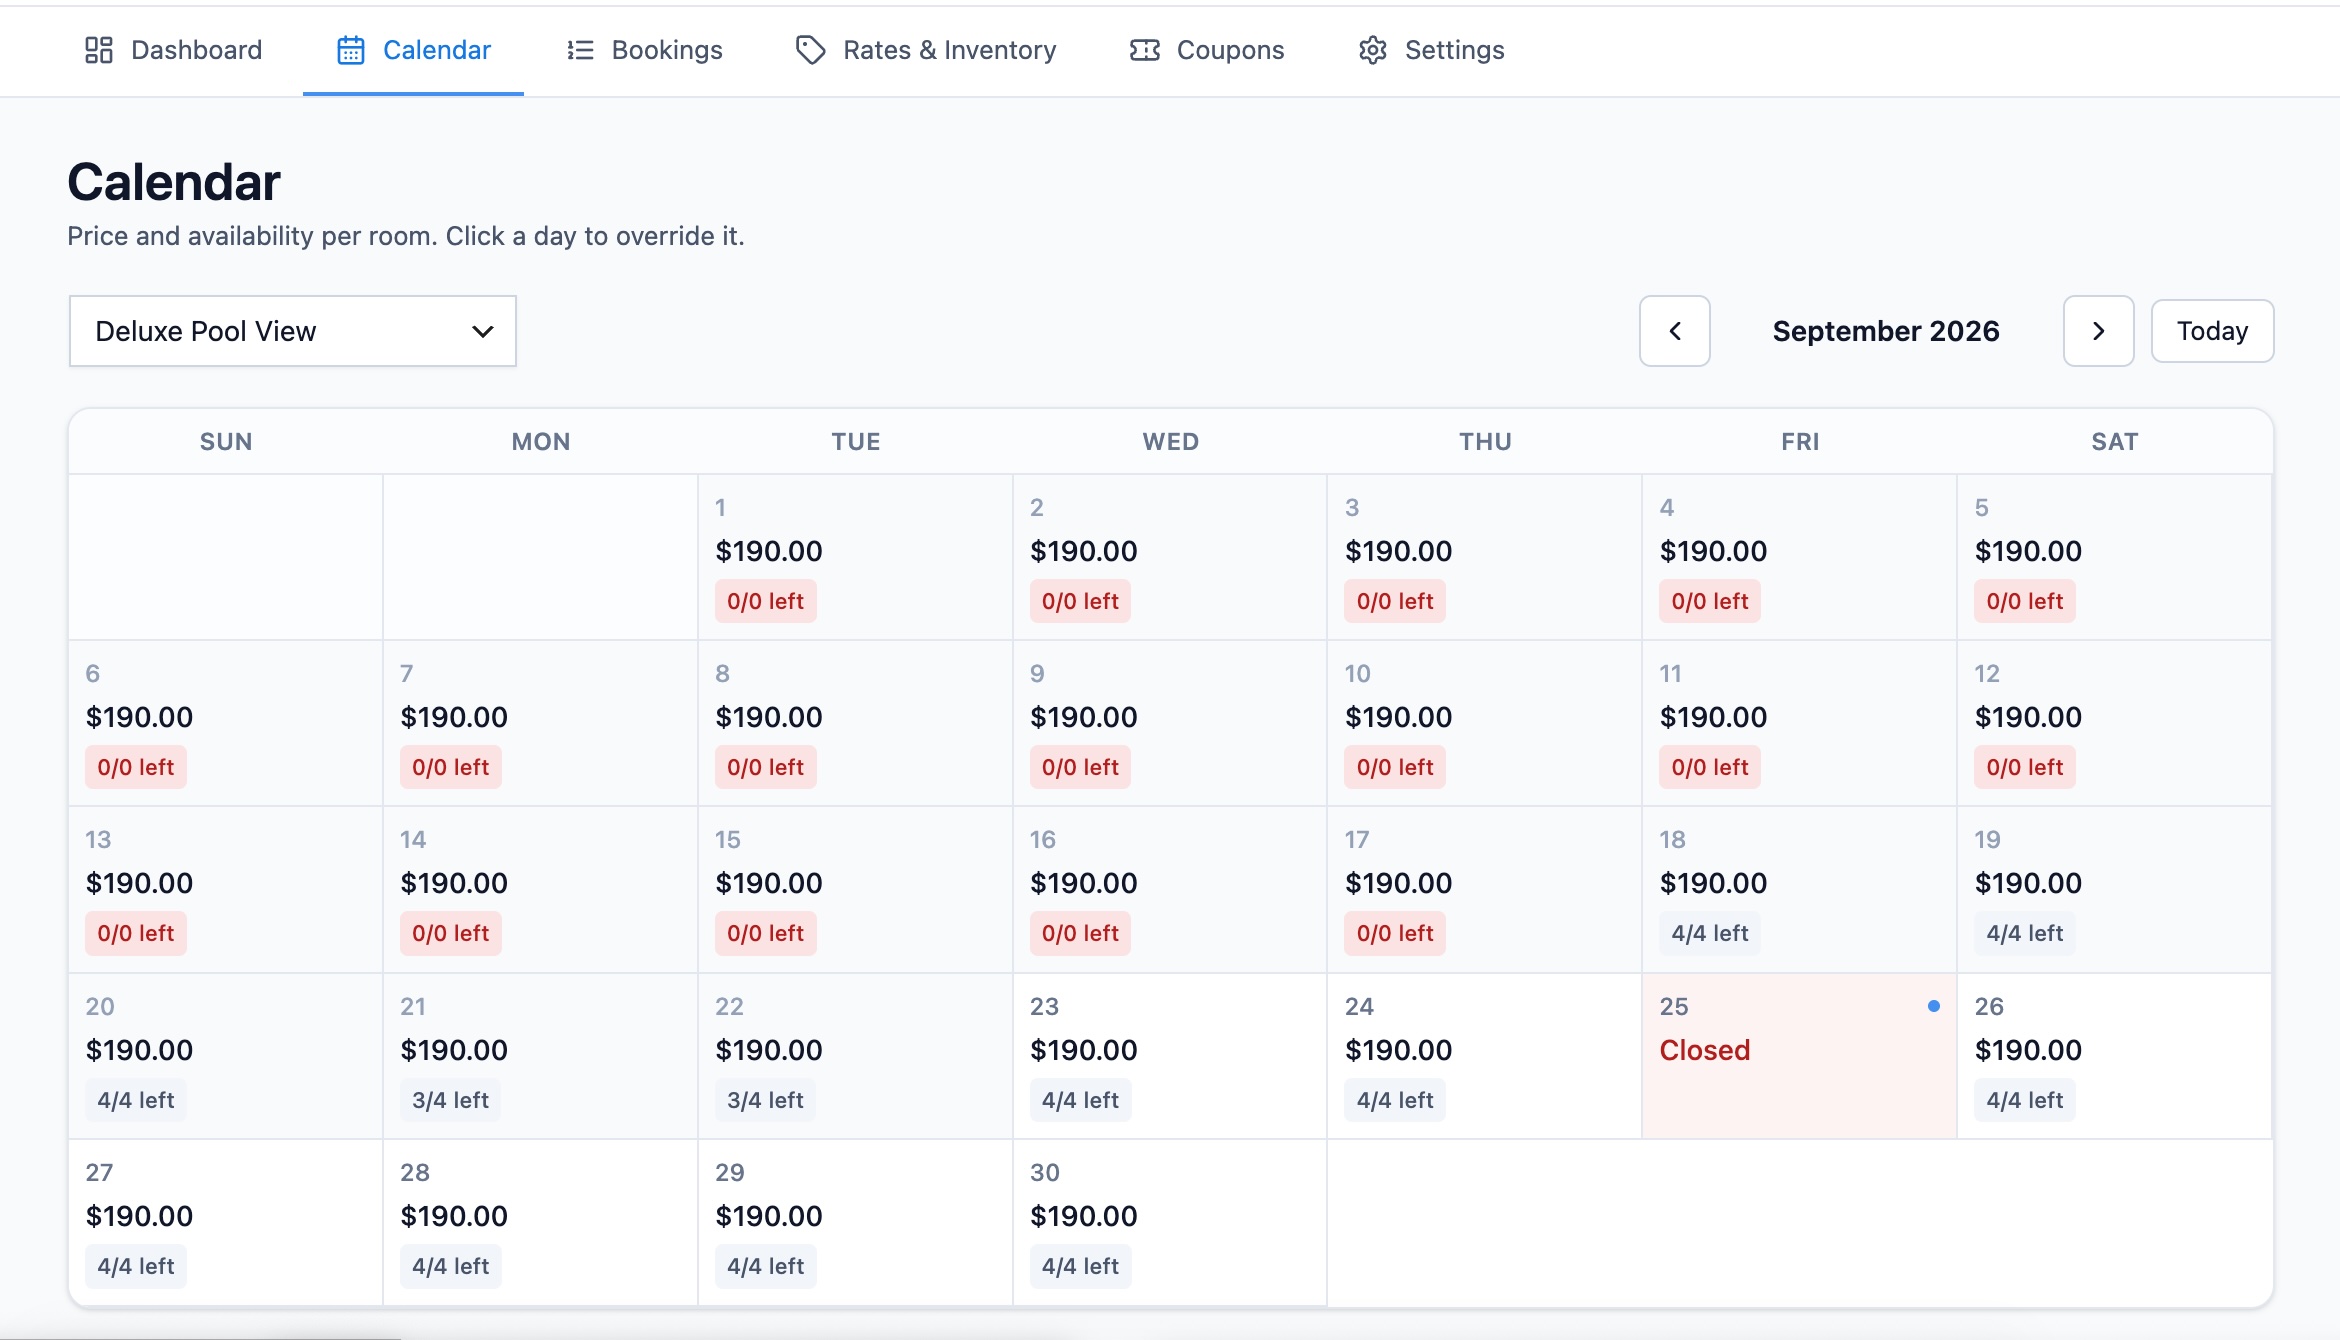
The Calendar tab gives a month view of availability and bookings across rooms, so you can see occupancy at a glance and spot gaps to fill.
Optional
Coupons
Create discount codes under the Coupons tab: a percentage or fixed amount, with optional limits. Guests enter the code at checkout and the discount is applied to the total.
Optional
Booking emails
Under Settings → Emails you can toggle each transactional email and edit its subject: booking received, admin notification, processing, completed, cancelled and the payment receipt.
Make sure emails actually arrive
Reference
Settings
The Settings tab groups everything else:
| Group | Controls |
|---|---|
| General | Currency, currency position and core booking rules. |
| Booking | Holds, deposits and payment timing. |
| Tax | Tax rate and how it is displayed. |
| Payments | Enable and configure gateways. |
| Emails | Toggle and edit each transactional email. |
| Danger Zone | Destructive actions such as data reset. |
Danger Zone
Help
Troubleshooting & FAQ
- A room does not show up for booking. Check that it is published, assigned to a property, has an active rate plan with a price, and has inventory on the dates you are testing. The Setup screen flags whichever piece is missing.
- The booking page link is wrong. The plugin detects the page by its shortcode content, not a fixed URL. Make sure your page contains the room list shortcode or block, or use Create booking pages.
- Guests are not getting emails. Confirm the email is enabled in Settings, then install an SMTP plugin such as Flexa MailBridge so mail is actually delivered.
- I need a feature that is not here. The plugin exposes actions and filters for developers. See the developer reference.